Distributed parallel programming in Python : MPI4PY

1 Introduction

MPI stands for Message passing interface. An implementation of MPI such as MPICH” or OpenMPI is used to create a platform to write parallel programs in a distributed system such as a Linux cluster with distributed memory. Generally the platform built allows programming in C using the MPI standard. So in order to run Parallel programs in this environment in python, we need to make use of a module called MPI4py which means “MPI for Python”. This module provides standard functions to do tasks such as get the rank of processors, send and receive messages/ data from various nodes in the clusters. It allows the program to be parallely executed with messages being passed between nodes. It is important that MPIch2 and MPI4py is installed in your system. So, if you haven’t installed MPI4Py, following are 2 guides to refer to for installing, building and testing a sample program in MPI4PY.

https://seethesource.wordpress.com/2015/01/05/raspberypi-hacks-part1/
https://seethesource.wordpress.com/2015/01/14/raspberypi-hacks-part2/

Once MPI4PY is installed, you can start programming in it. This tutorial covers the various important functions provide by MPI4PY like sending-receiving messages, scattering and gathering data and broadcastingmessage and how it can be used by providing examples. Using these information, it is possible to build scalable efficient distributed parallel programs in Python. So, let’s begin.

2 Sending and receiving Messages

Communication in mpi4py is done using the send() and he recv() methods. As the name suggests, it is used to send and receive messages from nodes respectively.

2.1 Introduction to send()

The general syntax of this function is: comm.send(data,dest)

here “data” can be any data/message which has to be sent to another node and “dest” indicates the process rank of node(s) to send it to.

Example: comm.send((rank+1)*5,dest=1).
This sends the message “(rank+1)*5” to the node with process rank=1. So only that node can receive it.

2.2 Introduction to recv()

The general syntax of this function is: comm.recv(source)

This tells a particular process to receive data/message only from the process with rank mentioned in “source” parameter.

Example: comm.recv(source=1)
This receives the message only from a process with rank=1.

2.3 Example with simple send() and recv()

if rank==0 :
	    data= (rank+1)*5
	    comm.send(data,dest=1)
if rank==1:
	    data=comm.recv(source-0)
	    print data

(For full implementation program refer to Example1.py)

[Download Example1.py]

2.4 Notes

  • When a node is running the recv() method, it waits till it receives some data from the expected source. Once it receives some data, it continues with the rest of the program.
  • Here, the “dest” parameter in send() and “source” parameter in recv() need not have just a constant value (or rank), it can be an expression.
  • The “size” member of “comm” object is a good way to conditionalize send() and receive() methods and this leads us to have dynamic sending and receiving of messages.

2.5 Sending and receiving dynamically

Dynamic transfer of data is far more useful as it allows data to be sent and received by multiple nodes at once and decision to transfer can be done depending on particular situations and thus this increases the flexibility dramatically.

2.6 Example of dynamic sending and receiving of data

comm.send(data_shared,dest=(rank*2)%size)
comm.recv(source=(rank-3)%size)

The above two statements are dynamic because, the data to be sent and also who it has to be sent to depends on the value substituted by rank and size , which are dynamically happen and so this eliminates the need for hard-coding the values. The recv() method, however, receives only one message even though its qualified to receive many of them, so only the first message it receives, it services and continues to the next statement in the program.

(for full implementaion refer to Example2.py)

[Download Example2.py]

3 Tagged send() and recv() functions

When we tag the send() and recv(), we can guarantee the order of receiving of messages, thus we can be sure that one message will be delivered before another

During dynamic transfer of data, situations arise where, we need a particular send() to match a particular recv() to achieve a kind of synchronization. This can be done using the “tag” parameter in both send() and recv().

For example a send() can look like : comm.send(shared_data,dest=2,tag=1) and a matching recv() to the above statement would look like: comm.recv(source=1,tag=1)

So, this structure forces a match, leading to synchronization of data transfers. The advantage of tagging is that a recv() can be made to wait till it receives data from a corresponding send() with the expected tag. But, this has to be used with extreme care as it can lead to a deadlock state.

3.1 Example

  If rank==0:
	shared_data1 = 23
	comm.send(shared_data1,dest=3,tag=1)
	shared_data2 = 34
	comm.send(shared_data2,dest=3,tag=2)
  if rank==3:
	recv_data1 = comm.recv(source=0,tag=2)
	print  recv_data1
	recv_data2 = comm.recv(source=0,tag=1)
	print  recv_data2

The output of this would look like:

34
23

Thus, we can see that even though shared_data1 was sent first the first recv() waited for the send() with tag=2 and received the data , printed it and forwarded it to the next recv() method.

(For full implementations refer to Example3.py)

[Download Example3.py]

to view full post visit here.

Python for Pi cluster Part 2: testing mpi4py and running MPI programs with python

The previous post demonstrates how we can go about building mpi4py so that we can write and run python programs using MPICH. So once the mpi4py is built and is installed, it has to be tested.

Here, it is assumed that you have a machinefile that stores the IP addresses of all the nodes in the network. This will be used by the MPICH to communicate and send/receive messages between various nodes.

In the extracted folder mpi4py, is another folder named demo. The demo folder has many python programs that can be run to test the working of mpi4py.

Initially a good, testing program is the helloworld.py. The procedure to run it is:

cd ~/mpi4py/demo

mpiexec –np 4 –machinefile ~/mpitest/machinefile python helloworld.py


output:

latest blog2

So if the output looks similar as above and all the nodes have been included, then it works.

Please note that ~/mpi4py/demo is the path to mpi4py on my system and to be replaced with the one in yours. Same is the case with path to the machinefile.

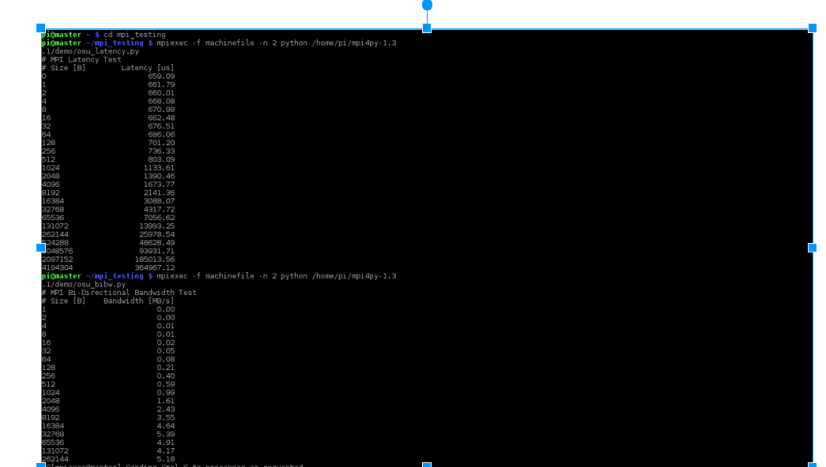
There are other programs in the demo folder that can be used. For example,


There are some benchmark programs created by the Ohio State University. They are :

  • osu_bw.py :  This program calculates bandwidth where, the master node sends out a series of fixed size messages to other nodes, and the receiver sends a reply only after all the messages is received. So the master node calculates the bandwidth based on the time elapsed and bytes sent by the user.
  • osu_bibw.py : This program  is similar to the above one but both nodes are involved in sending and receicing a series of messages.
  • osu_latency.py : This program when run send mesages to various nodes and waits for a reply from them. This occurs various number of times and the latency is calculated.

These are many other programs in the demo folder that can be tested. All of these programs can be run in a similar way that helloworld.py was run.

latest blog3


Once the testing is done, programs compatible with MPI can be written using python.The way in which MPI programs work is that, all the nodes in the cluster should have the same program. So every processor runs the program but depending on conditions it executes only a part of the program, so this allows parallel executions.

This also means that we can write 2 different programs and give it the same name and share store each of such program on different nodes. and run them. So this can be used to create a server program and store it on the master node and another program can be written as the client program and stored with the same name  on worker nodes.


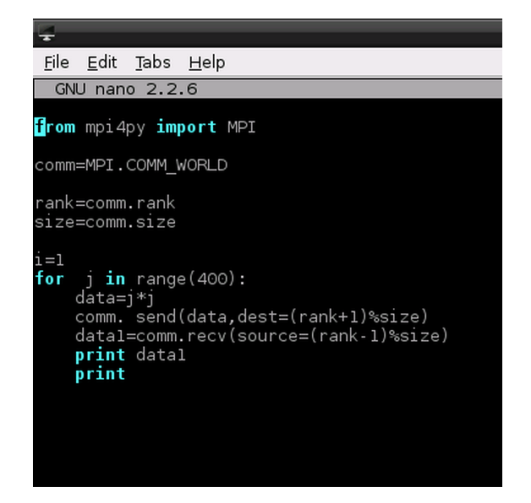
A sample MPI program:

latest blog4


So the above program has a communicator that contains all kinds of methods and process information and its called MPI.COMM_WORLD. Its various features are:

  • comm.rank : It gives the rank of the process running on that processor or node.
  • comm.size : It provides the number of nodes in the cluster
  • comm.get_processor_name() : It gives the name of the processor on which a particular process is running.
  • com.send() :  is used to send data to a node, indicated by the dest parameter.
  • comm.receive() : is used to receive some data from source node received from the node indicated by the source parameter.

These are the basic functions. But many others are present that can be utilised to create a MPI compliant python program.


One thing to note that, if  edge conditions are not taken care of and number processes to be used is provided to be greater than the number of nodes then the execution of the program fails. To avoid this the processes can be given a loop around by using the

%size operation as shown in the above example,  that would wrap around from the 1st processor to do the task.


Raspberry Pi Hacks – Part 1: building MPI for python on a Raspberry Pi cluster

This article assumes that a raspberry Pi cluster is running the latest Raspbian OS and the MPICH2 interface is built and is operational.
(if you haven’t built a cluster and want to , do comment here with your email id/some contact on social media and I can provide the resource and our procedure sheet)
Now the conventional way to install the MPI for python (which is called mpi4py) will not work. That is using the command:

 sudo apt-get install python-mpi4py

will install the mpi4py, but when its run to execute, it fails or crashes. This will be observed only by the developers who have installed MPICH2 interface in their cluster. The reason why it crashes is, unknowingly,  the command above will install instances of openMPI. OpenMPI is a different interface that clashes with the one that is already installed, MPICH2. A system is usually designed to run only one interface and when there are multiple instances running, it leads to a system failure.

To avoid this failure and the tedious task to restore the operating system back to its previous state, a work around exists. This work around is to build the mpi4py manually on each of the node in the cluster.

The following are the steps to build it:

1) download the mpi4py package.

      curl –k –O https://mpi4py.googlecode.com/files/mpi4py-1.3.1.tar.gz

      We can use wget instead of curl but I couldn’t find an option that bypasses the certificate    issue that hasn’t been resolved by the website maintenance team.

2) Unpack it. And change to that folder.

       tar –zxf mpi4py-1.3.1.tar.gz
cd mpi4py-1.3.1.tar.gz

3) Before the build is started, it is important to make sure that all the python development tools     are available.

This ensures that many important header files like Python.h is present and can be used by the build function.

(This step can be skipped if the python development tools are already installed)

         sudo apt-get update –fix-missing

         sudo apt-get install python-dev

4) Now, we can build the package.

           cd mpi4py-1.3.1.tar.gz

           sudo python setup.py build  –mpicc=/usr/local/mpich2/bin/mpicc

    few things that have to be noted here:

  •        The option –mpicc is used to provide the build file the location of the MPI compiler.
  •        The option –mpicc has to be used only if the location of that compiler doesn’t already exist in the system path.
  •        The path /usr/local/mpich2/bin/mpicc is the location on my node, where the mpich2 is built. It might not be the same for everyone and so that has to be replaced with the path, where mpicc is located in that system.

The only thing now left do is to install the build.to install change working directory to mpi4py:

cd mpi4py

After shifting to this directory, run the command :

sudo python setup.py install

Once this is done, repeat the process in every other node in the cluster. Then the demo program helloworld.py can be run to test if mpi4py is installed on all the node successfully and is running correctly.

If the nodes of the cluster aren’t already built, then the easier way to do it would be to perform the above procedure on one node and read the entire image of the OS and write it into the SD cards of each of the other node. This would eliminate building of mpi4py package on each node individually.


6 Common Errors When Building a Raspberry Pi Cluster

Though the Internet is a vast resource for getting a Pi cluster up and running, there is no full set of errors that you can refer to when you’re stuck. Many times it happens that the same error on two different clusters can have two totally different meanings, making it even more difficult to solve problems. The issues that come with building these clusters are increasingly relevant as their popularity increases in all parts of the world.

Raspberry Pi clusters are affordable and can be clustered to make a super computer or cloud computing clusters. It can be use for many cool application like desk automation.Raspberry Pi: Make a Bench automation computer
Bobo Cloud, for example, is an open-source cloud service for students built on Raspberry Pis.

As thse clusters become more common, there will be an increasing need for documentation and other resources. This post intends to be a reource for troubleshooting problems. It describes five common types of errors that beginners in this field of Raspberry Pi may encounter and their possible solutions.

Power Issues

Errors:

  • First boot password change is not allowed or password change on first boot hangs the Pi each time.
  • Any time the Raspberry  Pi is fired up, only two of its ports work. For example, only the two USB ports might work and the HDMI port connecting to a terminal and the ethernet port don’t. Or, the  HDMI and one USB work, disabling the rest of the ports on the device.
  • Midway into operating, the Raspberry Pi restarts and continues to restart repeatedly at irregular intervals.
  • All ports work fine but the Pi stops responding to key presses.

Problem and solution:

These problems are caused by lack of power to the Pi. Raspberry Pi is designed to run on low power but when the power supply  goes much lower than required, it works but does not perform at its full capacity.

An ideal power supply for Raspberry Pi model B is 5v, 2A . Though most of the mobile adapters are used to power the Pi, most of the times it has much lesser power rating which leads to the above problems.

Also, if the adapter is built to send the power through a micro USB cord, low-quality adapters cause loss during power transmission so that the full 5V is not delivered.

You might be able to use a workaround for some of the above errors, like for detecting the key presses of a keyboard by changing configuration of the speed of USB transfers, but doing so merely delays the onset of the other errors. Instead, get a good quality adapter to fix these errors.

Overlapping MPI Problems

Errors:

  • mpiexec crash
  • ssh error: error passing parameters

Problem and solution:

These errors occur generally due to the overlapping of multiple MPI distributions. The most commonly used and ideal distributions are OpenMPI and MPICH. Linux generally uses MPICH.

When you install packages directly to the system with one of the MPI distributions, overlapping occurs leading to the corruption of mpiexec and behavior of mpicc. For example, direct installation of Python packages to run with MPI or multiple installations of the same MPI distribution (shared and unshared) leads to the  clashing. This happens because direct installation sometimes doesn’t check the full compatibility. It just checks for the dependencies and if that check is passed, the packages get downloaded and installed. Unknowingly these packages might install the MPI distribution, even if you’ve already installed an MPI distribution. It might also change the system path for MPI. This can corrupt the entire MPI installation.

The solution is to build each package manually. Installation guides specific to each
MPI distribution are typically available.  If not or if a manual build is not possible, make sure you have a restore point created before the installation so that any corruption can be backtracked

Hostname Issues

Errors:

  • hostname not resolved
  • $pi@(none):

Problem and solution:

This error was one of the most confusing to me. Why? Because a node wouldn’t know its hostname and it would give this error but would perform the task given to it 60 percent of the time. This occurs only if the hostname is changed from its default to something the user would want so that he/she can differentiate between the nodes.

The “hostname not resolved” error can be cleared by changing the hostnames in two places:

  • sudo nano /etc/hostname
  • sudo nano /etc/hosts

Run the above commands, each of  which opens a file. In that file, change the default

hostname to the hostname that is required.

Finally The  pi@(none) or (none) hostname errors occur when the hostname given has
the ‘-’ (hyphen symbol)  or any other symbol. The solution is to edit both the files mentioned above and replace the illegal symbol for the hostname with an
‘_’   (underscore symbol).        

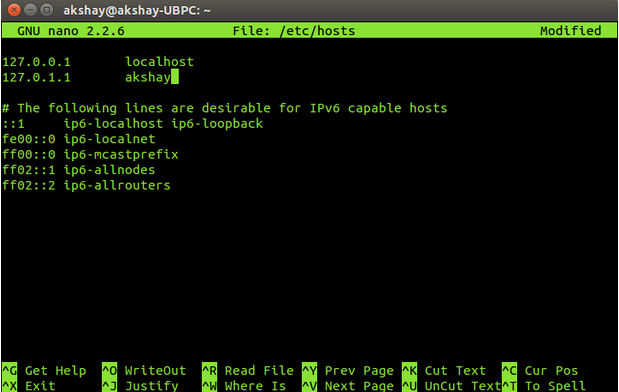
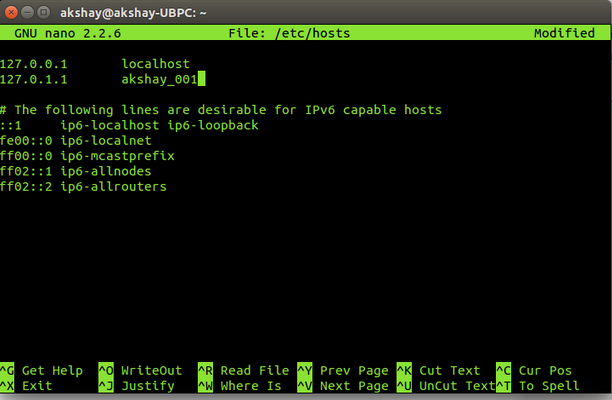
Below are two images of  file /etc/hosts before and after changing  hostname from
“akshay” to “akshay_001.”


Rpi1

Rpi2
    

The same has to be done for the other file. Save and reboot for the changes to be applied successfully.

HDMI Port Problems

Errors:

  • insufficient ports for connecting a display terminal
  • choosing the right display

Problem and solution:

More than any error this is a difficulty which many beginners might face. It happens
when you don’t have an HDMI port on a terminal/monitor or  when you want to connect a different display to the Raspberry Pi.

The solution lies in the availability of materials. The many options for connecting
the display are:

  • Use a display with an HDMI port.
  • Use an HDMI to VGA converter and connect it to the display.
  • Use an Ethernet cable to connect to a laptop’s display (this is recommended if you don’t need the Ethernet port for a LAN connection).
  • Use any computer or laptop’s display wirelessly using SSH. When SSH has been configured on both laptop and the Raspberry Pis, then it can be connected remotely, which means none of the ports on the device will be required.

Repeat Login Problems

Errors:

  • Connection to another node through SSH fails.
  • Login credentials required for each remote login to other nodes.
  • Error: RSA key not safe.
  • Warning: unprotected private key file.

Problem and solution:

The main aim for using SSH is what many computer experts call “secure gateway without login.” What this means is that you have to provide the login credential only for the first time you log in to the other node.  If you are asked to input credentials each time  you log into a node, it means something is wrong. In fact, it’s a disaster if the cluster has around 64 nodes and login is needed for each of them. This error generally occurs when the file containing the private key is copied to another location or its access permission has been tampered with. Another possible reason is that the hostname is not correctly configured, in which case SSH is not sure whether that node exists in its network or not. This leads the SSH to believe that the default setting no longer  exists and concludes that the network is not safe and secure. Hence, these errors.

I fixed these errors by changing the access permissions to only read and execute by the owner and no permissions to the group or  to others. If the hostnames are not configured properly, use the solution given for Hostname Issues above.

Shared Libraries Problem:

Errors:

  •  Build failed : mpicc not found.
  • –enable-shared option not recognized.

Problem and solution:

We had experienced these errors because of two reasons. Firstly, we had already  built mpich2 without shared libraries. And then tried to build a shared version parallel to it. Now , theoretically, it shouldn’t be a problem and many papers published with regard to this suggest that it is possible to build  mpich2  with shared libraries parallel to  the version without shared libraries.  But turns out that, with the newer versions of mpich it doesn’t work.

For some users only the –enable-shared option might not be recognized. This is because the build script is not able to locate the path of mpicc or some other dependencies.

The solution is to build only the mpich with shared library.  And its advisable to build it in the /usr/local directory of the Raspbian OS. So this removes any ambiguity  in PATH information and leads to a successful build. It is important to know that having shared library is only important when there is a need for a dynamic library(.so) and not a static library(.a) . So if there any need to load libraries at runtime, mpich should be configured with shared libraries.